PyTorch Going Modular
Turning notebook code into reusable Python scripts — data_setup, model_builder, engine, utils, and train.
In 05 PyTorch Custom Datasets we built a full image-classification pipeline inside a single notebook. That pipeline — load data, build a model, train it, evaluate it, save it — is roughly the same every time we start a new project. The point of going modular is to stop copy-pasting that pipeline between notebooks and instead break it into small, reusable Python files we can import.
By the end of this lesson, the same pizza/steak/sushi training run will reduce from “scroll through the entire notebook” to one command:
python train.py
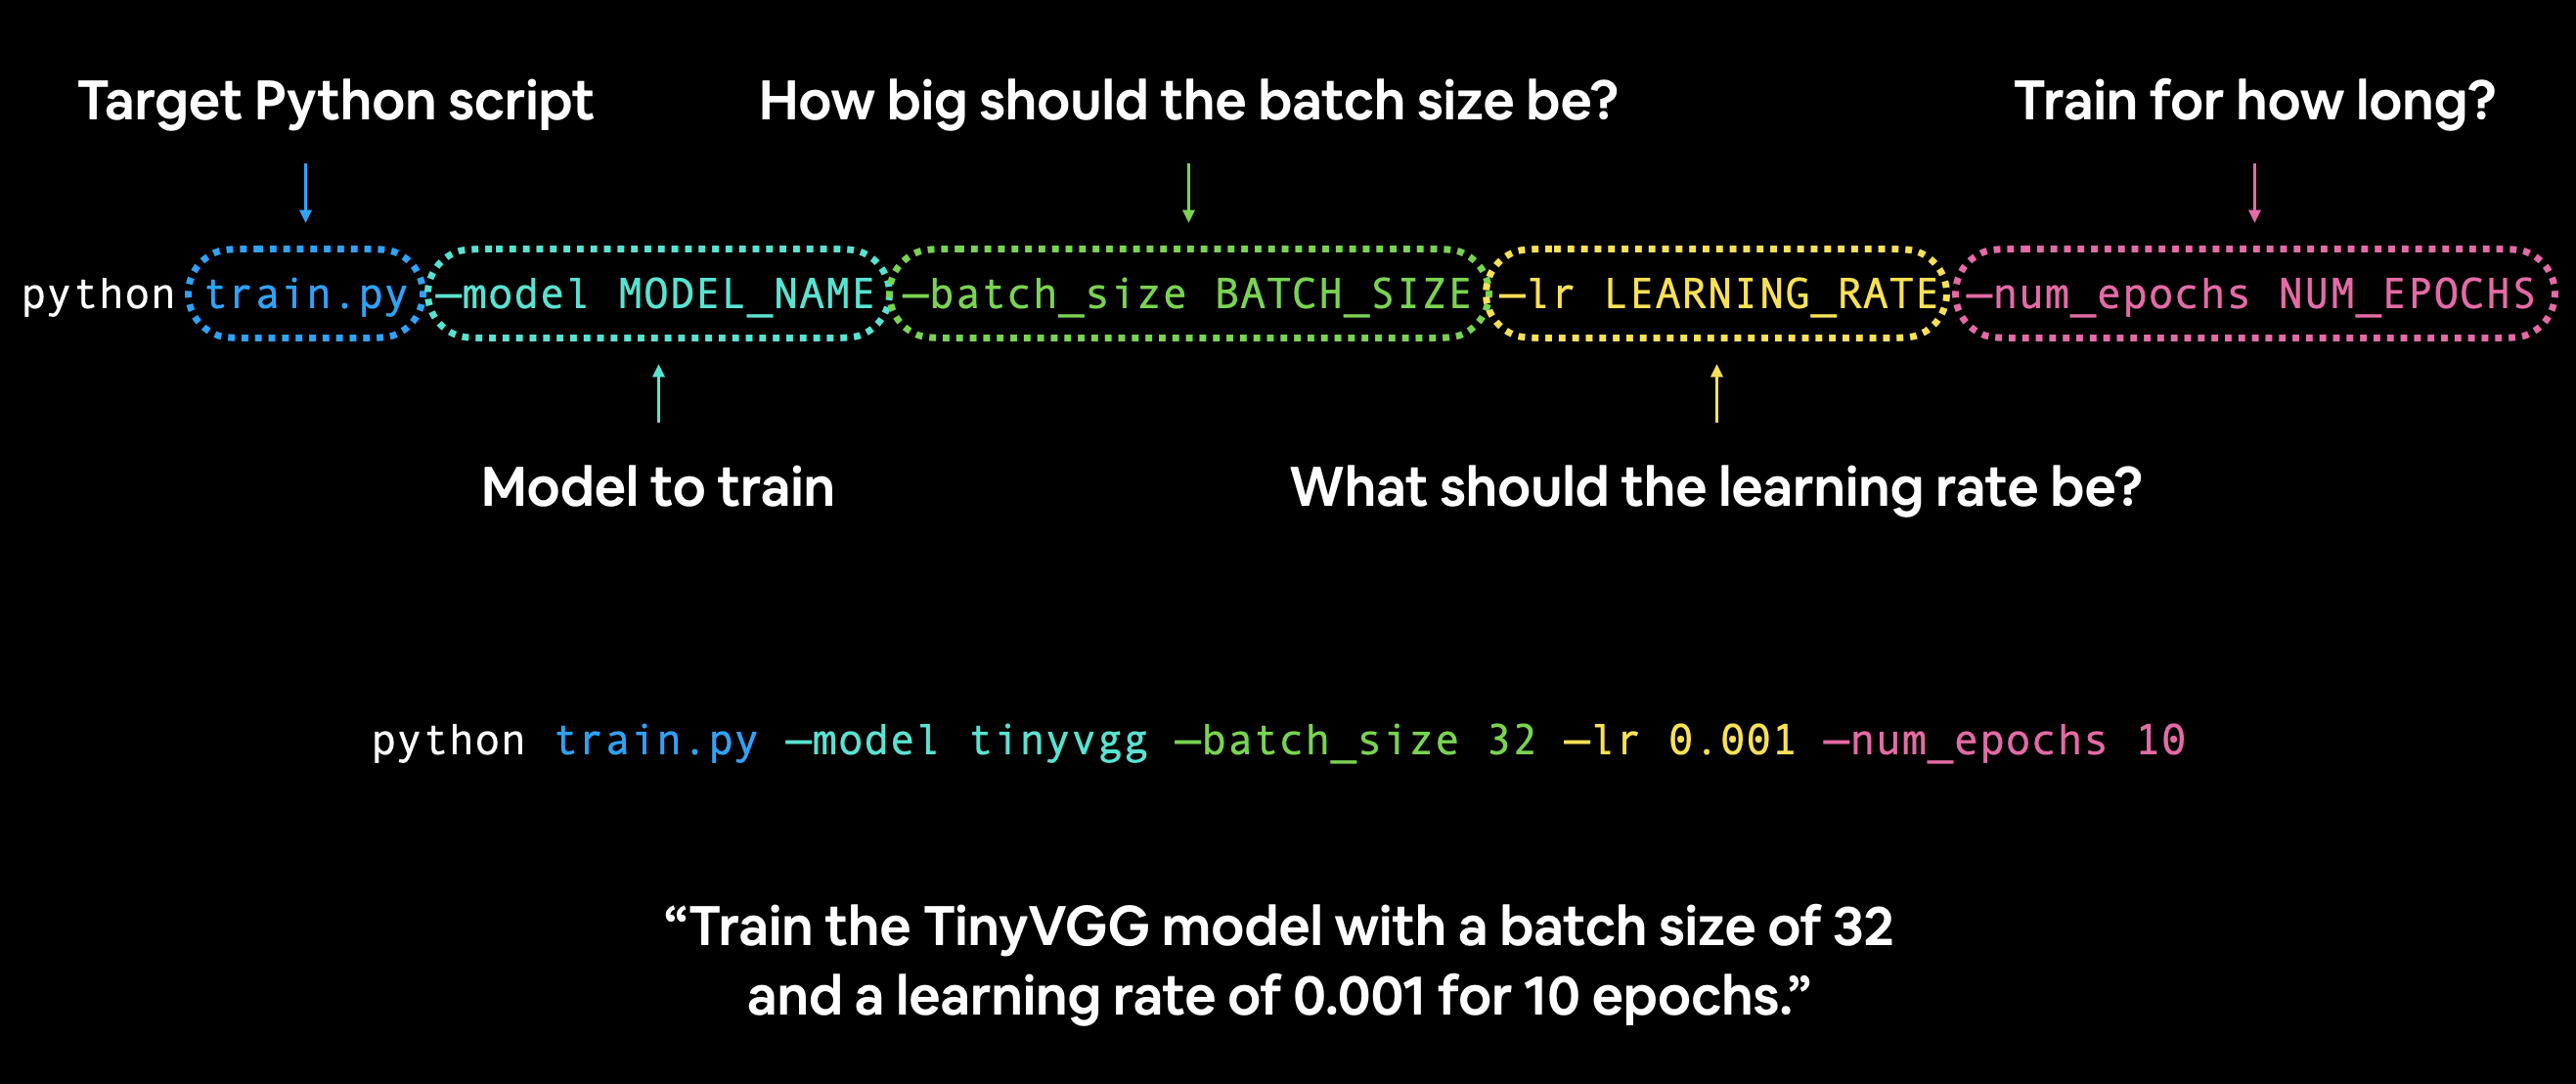
What is going modular?
Going modular means splitting your project into focused .py files, each with a single responsibility (data loading, model definition, training loop, helpers, orchestration). You import them in whatever script needs them, the way PyTorch itself imports torch.nn or torch.optim.
A notebook is great for exploring. A modular layout is great for running, sharing, and re-using. They aren’t competitors — most ML workflows do exploration in a notebook, then graduate the working code into scripts.
Why bother?
| Notebook | Python scripts | |
|---|---|---|
| Quick experimentation | Excellent — run one cell, see output | Awkward — must re-run the whole script |
| Visual / inline outputs | Built in (plots, tables, images) | Requires manual saving or a separate viewer |
| Version control | JSON cell metadata makes diffs noisy | Plain text — clean diffs in git |
| Re-use a single function | Copy-paste between notebooks | from engine import train |
| Run on a remote server | Needs Jupyter, port forwarding, etc. | python train.py over SSH |
| Hyperparameter sweeps / CI | Painful | Trivial with argparse and a shell loop |
The workflow most practitioners use:
- Prototype in a notebook until the code works end-to-end.
- Move the validated cells into Python files.
- From then on, edit the files; run
python train.pyto retrain.
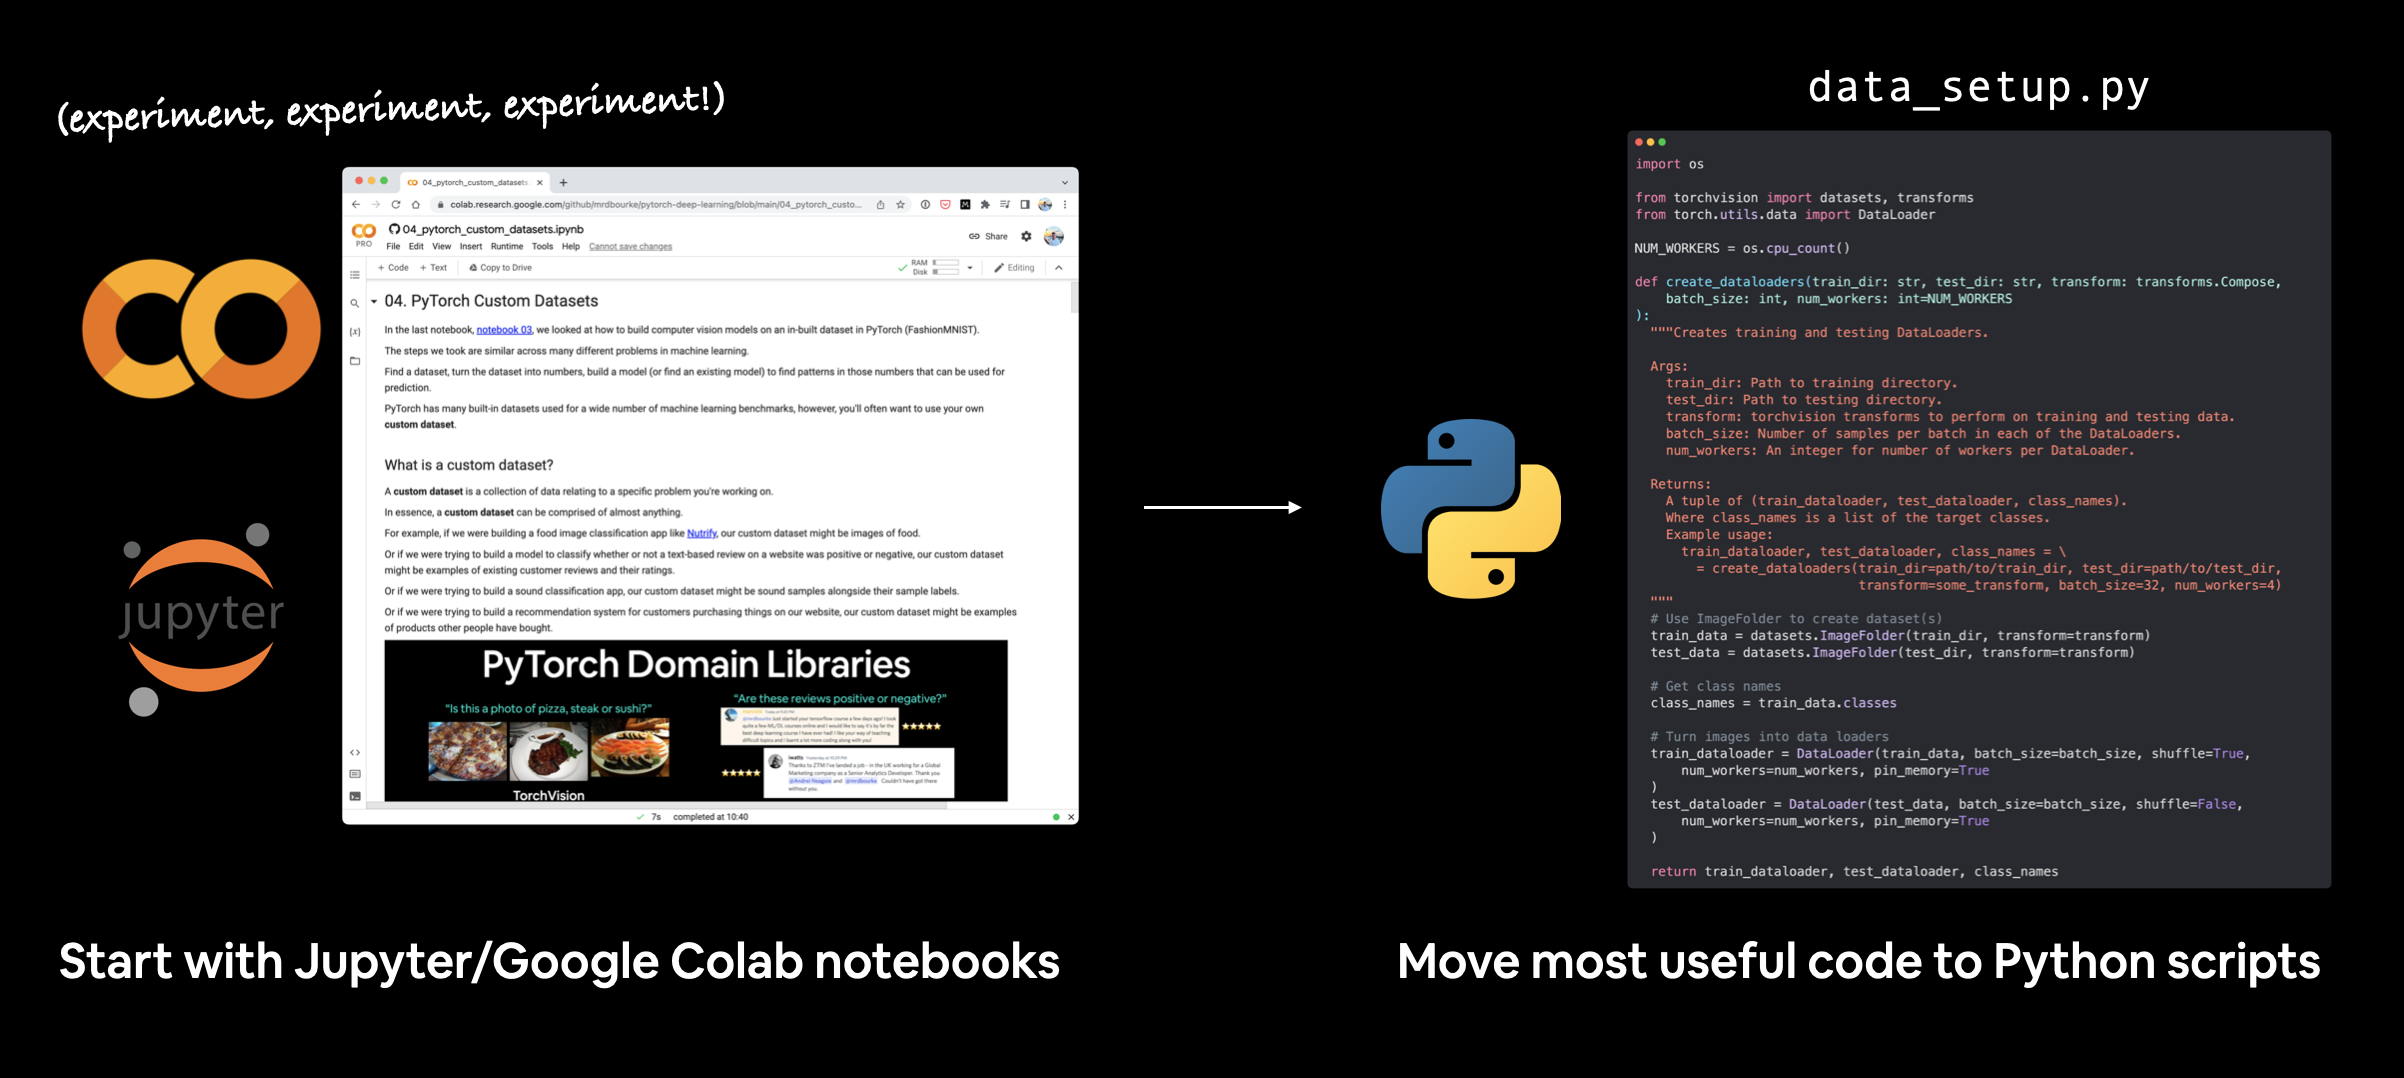
.py files as the code stabilizes.
Most large open-source PyTorch projects (e.g. torchvision/references/classification) follow exactly this pattern.
What we’re going to build
Our target directory layout:
going_modular/
├── going_modular/
│   ├── __init__.py
│   ├── data_setup.py        # build train/test DataLoaders
│   ├── engine.py            # train_step, test_step, train
│   ├── model_builder.py     # TinyVGG architecture
│   ├── train.py             # the main script
│   └── utils.py             # save_model
├── data/
│   └── pizza_steak_sushi/
│       ├── train/{pizza,steak,sushi}/
│       └── test/{pizza,steak,sushi}/
└── models/
    └── 06_tinyvgg_model.pth
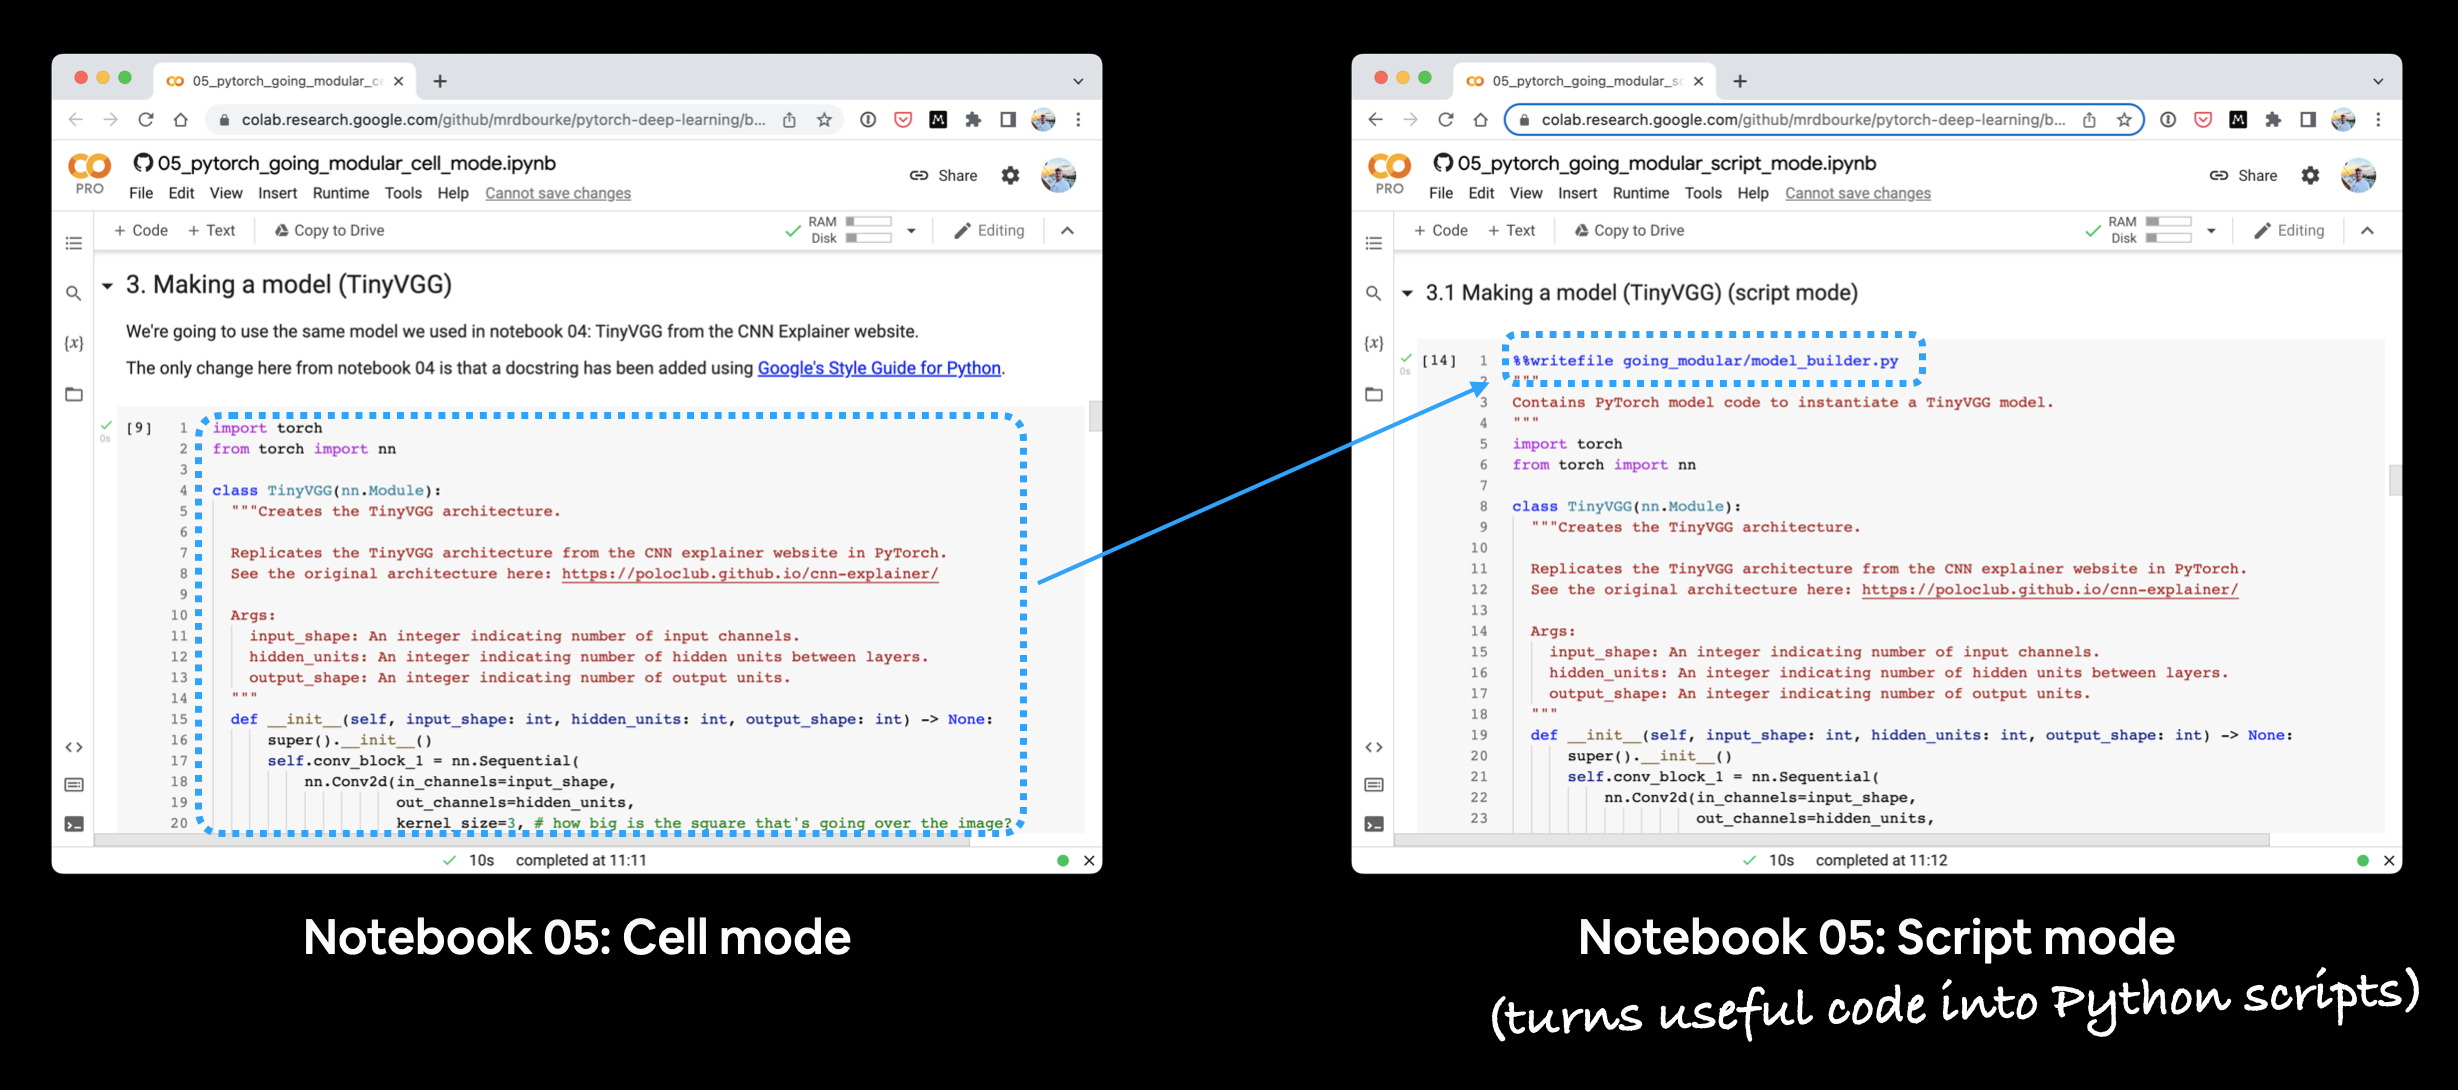
.py files.
A useful trick when working in a notebook: every cell that defines a script can begin with the IPython magic %%writefile:
%%writefile going_modular/data_setup.py
"""Functions for building DataLoaders."""
# ... rest of the file
That single line tells Jupyter to dump the cell’s contents to disk as going_modular/data_setup.py instead of executing it inline. Convenient when you want to keep your notebook and the resulting .py files in sync.
1. data_setup.py — building DataLoaders
The job of this file is exactly one thing: take train/test directories of images and return two DataLoaders plus the list of class names.
"""Contains functionality for creating PyTorch DataLoaders for
image classification data."""
import os
from torchvision import datasets, transforms
from torch.utils.data import DataLoader

NUM_WORKERS = os.cpu_count()

def create_dataloaders(
    train_dir: str,
    test_dir: str,
    transform: transforms.Compose,
    batch_size: int,
    num_workers: int = NUM_WORKERS,
):
    """Creates training and testing DataLoaders.

    Returns:
        A tuple of (train_dataloader, test_dataloader, class_names).
    """
    train_data = datasets.ImageFolder(train_dir, transform=transform)
    test_data  = datasets.ImageFolder(test_dir,  transform=transform)

    class_names = train_data.classes

    train_dataloader = DataLoader(
        train_data,
        batch_size=batch_size,
        shuffle=True,
        num_workers=num_workers,
        pin_memory=True,
    )
    test_dataloader = DataLoader(
        test_data,
        batch_size=batch_size,
        shuffle=False,
        num_workers=num_workers,
        pin_memory=True,
    )
    return train_dataloader, test_dataloader, class_names
A couple of details worth flagging:
shuffle=Truefor training (so each epoch sees batches in a different order),shuffle=Falsefor testing (so the test order is deterministic).num_workers=os.cpu_count()lets PyTorch use background processes to load images in parallel.pin_memory=Truespeeds up the CPU→GPU transfer when you’re training on a GPU.
2. model_builder.py — the TinyVGG architecture
A focused file that holds nothing but nn.Module subclasses. Today it has one — TinyVGG, the same architecture as CNN Explainer.
"""Contains PyTorch model code for instantiating TinyVGG."""
import torch
from torch import nn

class TinyVGG(nn.Module):
    """TinyVGG architecture.

    Args:
        input_shape:  number of input channels (e.g. 3 for RGB).
        hidden_units: number of hidden units between conv layers.
        output_shape: number of output classes.
    """
    def __init__(self, input_shape: int, hidden_units: int, output_shape: int):
        super().__init__()
        self.conv_block_1 = nn.Sequential(
            nn.Conv2d(input_shape, hidden_units, kernel_size=3, padding=0),
            nn.ReLU(),
            nn.Conv2d(hidden_units, hidden_units, kernel_size=3, padding=0),
            nn.ReLU(),
            nn.MaxPool2d(kernel_size=2),
        )
        self.conv_block_2 = nn.Sequential(
            nn.Conv2d(hidden_units, hidden_units, kernel_size=3, padding=0),
            nn.ReLU(),
            nn.Conv2d(hidden_units, hidden_units, kernel_size=3, padding=0),
            nn.ReLU(),
            nn.MaxPool2d(kernel_size=2),
        )
        self.classifier = nn.Sequential(
            nn.Flatten(),
            nn.Linear(hidden_units * 13 * 13, output_shape),
        )

    def forward(self, x: torch.Tensor) -> torch.Tensor:
        return self.classifier(self.conv_block_2(self.conv_block_1(x)))
The 13 * 13 in the linear layer comes from the spatial size after two conv blocks on a 64×64 input — nothing magical, just (((64−2)−2)//2 −2 −2)//2 = 13. If you change input size, recompute.
3. engine.py — the training loop
This is the file you’re most likely to reuse across projects. Three functions:
train_step— one epoch over the training set, returns mean loss and accuracy.test_step— one epoch over the test set, no gradients.train— calls the two above forepochsiterations and collects history.
"""Contains functions for training and evaluating a PyTorch model."""
from typing import Dict, List, Tuple
import torch
from tqdm.auto import tqdm

def train_step(model, dataloader, loss_fn, optimizer, device):
    model.train()
    train_loss, train_acc = 0.0, 0.0
    for X, y in dataloader:
        X, y = X.to(device), y.to(device)
        logits = model(X)
        loss = loss_fn(logits, y)

        optimizer.zero_grad()
        loss.backward()
        optimizer.step()

        train_loss += loss.item()
        train_acc  += (logits.argmax(dim=1) == y).float().mean().item()

    return train_loss / len(dataloader), train_acc / len(dataloader)

def test_step(model, dataloader, loss_fn, device):
    model.eval()
    test_loss, test_acc = 0.0, 0.0
    with torch.inference_mode():
        for X, y in dataloader:
            X, y = X.to(device), y.to(device)
            logits = model(X)
            test_loss += loss_fn(logits, y).item()
            test_acc  += (logits.argmax(dim=1) == y).float().mean().item()
    return test_loss / len(dataloader), test_acc / len(dataloader)

def train(model, train_dataloader, test_dataloader,
          optimizer, loss_fn, epochs, device) -> Dict[str, List[float]]:
    results = {"train_loss": [], "train_acc": [], "test_loss": [], "test_acc": []}
    for epoch in tqdm(range(epochs)):
        tr_loss, tr_acc = train_step(model, train_dataloader, loss_fn, optimizer, device)
        te_loss, te_acc = test_step(model, test_dataloader, loss_fn, device)

        print(f"Epoch {epoch+1} | "
              f"train_loss {tr_loss:.4f} | train_acc {tr_acc:.4f} | "
              f"test_loss  {te_loss:.4f} | test_acc  {te_acc:.4f}")

        results["train_loss"].append(tr_loss)
        results["train_acc"].append(tr_acc)
        results["test_loss"].append(te_loss)
        results["test_acc"].append(te_acc)
    return results
The pattern is identical to the loop you wrote inside the notebook in chapter 04 — only the bookkeeping has been promoted into named functions.
4. utils.py — helpers
A grab-bag for things that don’t belong anywhere else. For now, just save_model.
"""Helper functions used across the project."""
from pathlib import Path
import torch

def save_model(model: torch.nn.Module, target_dir: str, model_name: str) -> None:
    """Save model.state_dict() to target_dir/model_name."""
    target_dir_path = Path(target_dir)
    target_dir_path.mkdir(parents=True, exist_ok=True)

    assert model_name.endswith(".pth") or model_name.endswith(".pt"), \
        "model_name should end with .pt or .pth"

    model_save_path = target_dir_path / model_name
    print(f"[INFO] Saving model to {model_save_path}")
    torch.save(model.state_dict(), model_save_path)
We save state_dict(), not the whole model. The state dict is just a dictionary of parameter tensors — small, portable, and forward-compatible with code changes. Re-loading is two lines: instantiate the model class, then call model.load_state_dict(torch.load(path)).
5. train.py — the entry point
Now we glue everything together.
"""Trains a TinyVGG model on the pizza/steak/sushi dataset."""
import os
import torch
from torchvision import transforms
from going_modular import data_setup, engine, model_builder, utils

# Hyperparameters
NUM_EPOCHS    = 5
BATCH_SIZE    = 32
HIDDEN_UNITS  = 10
LEARNING_RATE = 0.001

# Paths
train_dir = "data/pizza_steak_sushi/train"
test_dir  = "data/pizza_steak_sushi/test"

# Device
device = "cuda" if torch.cuda.is_available() else "cpu"

# Transforms
data_transform = transforms.Compose([
    transforms.Resize((64, 64)),
    transforms.ToTensor(),
])

# Data
train_dl, test_dl, class_names = data_setup.create_dataloaders(
    train_dir=train_dir, test_dir=test_dir,
    transform=data_transform, batch_size=BATCH_SIZE,
)

# Model
model = model_builder.TinyVGG(
    input_shape=3, hidden_units=HIDDEN_UNITS, output_shape=len(class_names)
).to(device)

# Loss + optimizer
loss_fn   = torch.nn.CrossEntropyLoss()
optimizer = torch.optim.Adam(model.parameters(), lr=LEARNING_RATE)

# Train
engine.train(model=model,
             train_dataloader=train_dl, test_dataloader=test_dl,
             optimizer=optimizer, loss_fn=loss_fn,
             epochs=NUM_EPOCHS, device=device)

# Save
utils.save_model(model=model, target_dir="models", model_name="06_tinyvgg_model.pth")
Run it:
python going_modular/train.py
You should see the same training output you used to see in the notebook — only now it’s reproducible from a single command, which means you can launch it on a remote machine, schedule it with cron, drop it into a CI pipeline, or wrap it in a hyperparameter sweep.
Going further: command-line flags
Hardcoding LEARNING_RATE = 0.001 works for one run, but the moment you want to try 0.01, you’d have to edit the file. Python’s standard library has a fix: argparse.
import argparse
parser = argparse.ArgumentParser()
parser.add_argument("--epochs",     type=int,   default=5)
parser.add_argument("--batch_size", type=int,   default=32)
parser.add_argument("--lr",         type=float, default=0.001)
args = parser.parse_args()

# ... use args.epochs, args.batch_size, args.lr below
Now you can call:
python train.py --epochs 20 --lr 0.003 --batch_size 64
This is exactly how big PyTorch projects expose hyperparameters.
Takeaways
- Modular = one responsibility per file.
data_setup,model_builder,engine,utils,train. - Notebook → script is a graduation, not a replacement. Prototype in a notebook, ship in a script.
- Always save
state_dict, not the whole model. Smaller, portable, and survives code refactors. - Make your training script runnable from one command. Future-you will thank present-you when training on a remote box.
- Add
argparseearly — turning a hyperparameter into a CLI flag costs three lines and saves dozens of edits.
In 07 PyTorch Transfer Learning we’ll re-use exactly these modules and swap in a pretrained model — pushing test accuracy from ~40 % to over 80 % on the same dataset, with almost no code change.